Let’s Encrypt
它为安全网站提供免费的SSL/TLS证书。
一直想为个站加上 SSL 证书,谁都想在浏览器上看到那一把漂亮的绿色小锁!
今天总算升级成功,在网上参考了不少资料文章,也随手记录下本次升级的日志吧。
Let’s Encrypt 的由来就不再多讲了,网上真的是一大堆类似我篇文章的教程啊喂!
非 root 安装参考:
acme.sh
这是一个实现 ACME 客户端协议的纯 Unix Shell 脚本,
它能从 Let’s Encrypt 生成免费的证书,接下来便是使用它来完成整个 SSL 配置。
安装 acme.sh
curl https://get.acme.sh | sh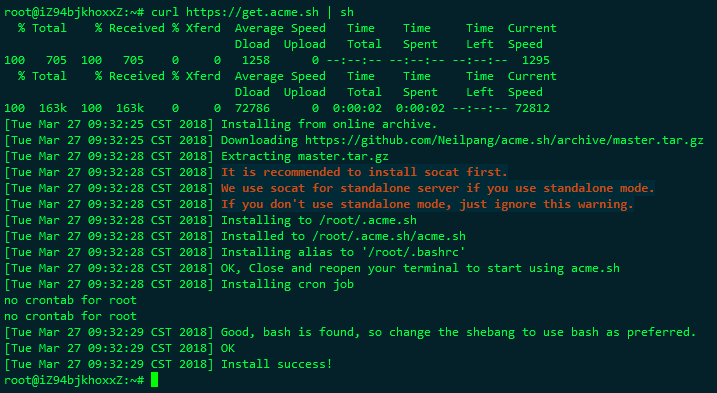
短暂下载后,acme.sh 安装完毕,接下来我们需要让重新载入 .bashrc:
source ~/.bashrc重新载入后,便有了 acme.sh 命令,并且它还创建了一个定时任务:
- 每60天会重新更新一次证书
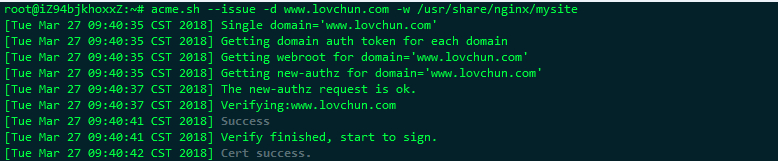
申请签发 SSL 证书
acme.sh --issue -d your_domain -w your_web_path这行命令,会在你所给予的 your_web_path 目录中创建 .well-known 目录,
因此你需要保证 your_web_path 是可写并且可访问,或者你也可以提前创建 .well-known。
做过公众号开发的应该知道,微信在后面某次改版后,会要求你在服务器上放置 MP_verify_XXXXX.txt,并且能被访问,
上述的 .well-known 和这个有点类似,acme.sh 也会检测该文件以此来判断该网站是否属于你本人。
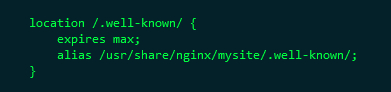
某些框架,例如我的个站使用的是 Django,它本身不会帮助我处理静态资源文件,
因此,还需要在 Nginx 里配置一下这个目录的访问:
安装 SSL 证书
同样的,你需要准备一个 ssl 目录:
acme.sh --installcert -d www.your-app.com \
--keypath /home/ubuntu/www/ssl/www.your-app.com.key \
--fullchainpath /home/ubuntu/www/ssl/www.your-app.com.key.pem \
--reloadcmd "sudo service nginx force-reload"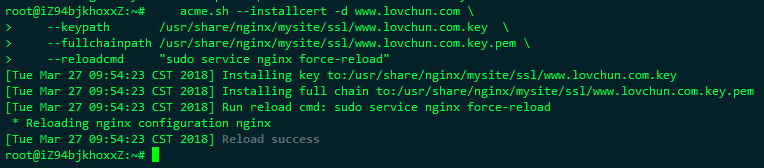
生成 dhparam.pem 文件
openssl dhparam -out /home/ubuntu/www/ssl/dhparam.pem 2048配置 Nginx
我将 lovchun.com 和 www.lovchun.com 都指向了站点,
但是我希望这两个域名通过 http 访问时,也都能跳转至 www.lovchun.com,
因此需要在 Nginx 中添加一个 301 重定向配置:
server {
listen 80;
server_name lovchun.com www.lovchun.com;
return 301 https://www.lovchun.com$request_uri;
}接下来,配置 SSL:
server {
ssl_protocols TLSv1 TLSv1.1 TLSv1.2;
ssl_prefer_server_ciphers on;
listen 443 ssl;
server_name wwww.lovchun.com;
ssl_certificate /usr/share/nginx/mysite/ssl/www.lovchun.com.key.pem;
ssl_certificate_key /usr/share/nginx/mysite/ssl/www.lovchun.com.key;
ssl_dhparam /usr/share/nginx/mysite/ssl/dhparam.pem;
root /usr/share/nginx/mysite;
access_log /var/log/nginx/mysite.access.log;
error_log /var/log/nginx/mysite.error.log;
location / {
proxy_set_header Host $host:80;
proxy_set_header X-Real-IP $remote_addr;
proxy_set_header X-Forwarded-For $proxy_add_x_forwarded_for;
proxy_pass http://127.0.0.1:8002;
}
location /static/ {
gzip_static on;
expires max;
add_header Cache-Control public;
alias /usr/share/nginx/mysite/static_cdn/;
}
location /.well-known/ {
expires max;
alias /usr/share/nginx/mysite/.well-known/;
}
location /favicon.ico {
expires max;
alias /usr/share/nginx/mysite/static_cdn/favicon.png;
}
}最后重启 Nginx,访问 www.lovchun.com,就能看到那一把绿色的漂亮小锁了!
