目录
- 《构建 Vue3 组件库 - 如何开始》
- 《构建 Vue3 组件库 - 安装依赖》
- 《构建 Vue3 组件库 - 图标》
- 《构建 Vue3 组件库 - 组件》
- 《构建 Vue3 组件库 - 样式》
- 《构建 Vue3 组件库 - 调试》
- 《构建 Vue3 组件库 - 文档》
- 《构建 Vue3 组件库 - 渲染器》
- 《构建 Vue3 组件库 - 打包》
源码
导入组件库
和调试组件一样,使用 vitepress 编写文档时,也需要安装并实时的调试组件:
import { resolve } from "path";
import type { UserConfig } from "vite";
export default (): UserConfig => {
return {
root: "./docs",
optimizeDeps: {
exclude: ["vitepress"],
},
resolve: {
alias: {
"geist-design": resolve(__dirname, "../src/index.ts"),
"geist-design-styles": resolve(__dirname, "../src/_styles"),
},
},
css: {
preprocessorOptions: {
scss: {
// 前置引入工具模块,如果有需要
additionalData:
'@import "geist-design-styles/foundation/methods.scss";',
},
},
},
};
};在 package.json 中加入 docs 相关的 scripts:
{
"scripts": {
+ "docs:dev": "vitepress dev docs",
+ "docs:build": "vitepress build docs",
+ "docs:serve": "vitepress serve docs",
}
}安装组件库
import DefaultTheme from "vitepress/theme";
import GeistDesign from "geist-design";
import "geist-design-styles/index.scss";
import type { App } from "vue";
export default {
enhanceApp({ app }: { app: App }) {
app.use(GeistDesign);
},
};样式冲突
网上很多文章都“手把手教你开发组件库”,但却没有说如何解决组件库与 vitepress 样式冲突,
当你使用 layout:doc 来编写组件的 .md 页面后,你就会发现很多样式产生了冲突。
官方文档在 Custom Containers 有详细的说明,
npm i -D postcss新建 docs/postcss.config.mjs:
import { postcssIsolateStyles } from "vitepress";
export default {
plugins: [
postcssIsolateStyles({
includeFiles: [/vp-doc\.css/],
}),
],
};当你在使用组件库的组件时,只需要使用 .vp-raw 包裹,便不会再受到 vp-doc 的样式影响了:
<div class="vp-raw">
<g-avatar text="Geist" />
</div>文档规划
整个 vitepress 中会使用到的组件有 3 种:
- 组件库中的组件;
- 组件库的示例组件;
- 自定义组件;
组件库
我们已经在 themes/index.ts 中,通过 app.use() 批量注册过,可以直接使用。
组件库的示例组件
例如 <avatar /> 组件,它主要是一个容器组件,不同的 props 会带来不同的形状变化,可以建立多个 SFC demo;
自定义组件
项目中的自定义组件,例如一个用来渲染示例组件,并支持代码预览的组件。
目录结构
docs
┣ .vitepress
┃ ┣ theme
┃ ┃ ┣ components
┃ ┃ ┣ examples
┃ ┃ ┃ ┗ avatar
┃ ┃ ┃ ┃ ┣ basic.vue
┃ ┃ ┃ ┃ ┣ circle.vue
┃ ┃ ┃ ┃ ┗ size.vue
┃ ┃ ┗ index.ts
┃ ┗ config.ts
┣ components
┃ ┗ avatar.md
┣ guide
┣ public
┣ index.md
┣ tsconfig.json
┣ tsconfig.node.json
┗ vite.config.ts批量注册示例组件
随着组件库的庞大,示例组件 会越来越多,
为了能在 *.md 中使用,这些组件必须在 themes/index.ts 中使用 app.component() 进行注册:
import DefaultTheme from 'vitepress/theme'
import GeistDesign from 'geist-design'
import 'geist-design-styles/index.scss'
+ import AvatarBasic from './example/avatar/basic.vue'
+ import AvatarSize from './example/avatar/size.vue'
+ import AvatarCircle from './example/avatar/circle.vue'
import type { App } from 'vue'
export default {
enhanceApp({ app }: { app: App }) {
app.use(GeistDesign)
+ app.component('AvatarBasic', AvatarBasic)
+ app.component('AvatarSize', AvatarSize)
+ app.component('AvatarCircle', AvatarCircle)
}
}才写了三个,我就已经累到不行…
接下来,我们使用 import.meta.glob 来读取并批量注册 components/* 和 examples/* 中的 SFC:
type Module = { [key: string]: any };
const modules = import.meta.glob(
["./examples/**/*.vue", "./components/**/*.vue"],
{
eager: true,
}
);
const components: Component[] = [];
for (const path in modules) {
components.push((modules[path] as Module).default);
}
export default {
enhanceApp({ app }: { app: App }) {
app.use(GeistDesign);
components.forEach(component => {
if (component.name) {
app.component(component.name, component);
}
});
},
};渲染示例组件
代码高亮
渲染示例组件很简单,直接使用组件即可。
要高亮示例组件中的代码,我们需要用到 prismjs:
npm i -D prismjs @types/prismjs使用 prismjs 封装专门用于高亮代码的 prism.vue:
<script setup lang="ts">
import Prism from 'prismjs'
import { computed } from 'vue'
defineOptions({ name: 'ex-prism' })
const props = defineProps({
code: {
type: String,
required: true
},
inline: Boolean,
language: {
type: String,
// prism 不支持 language.vue
// sfc 可以按照 html 来高亮
default: 'html'
}
})
const prismGrammar = Prism.languages[props.language]
if (!prismGrammar) {
throw new Error(
`"${props.language}" 不存在, 可用的 language 列表: https://prismjs.com/#supported-languages`
)
}
const className = computed(() => `language-${props.language}`)
const innerHTML = computed(() =>
Prism.highlight(props.code, prismGrammar, props.language)
)
</script>
<template>
<code v-if="inline" :class="className" v-bind="$attrs" v-html="innerHTML" />
<pre v-else :class="className" v-bind="$attrs" v-html="innerHTML" />
</template>只需要传入需要高亮的文本:rawData,就能高亮显示我们的代码:
<ex-prism code="const foo = 'bar'" />rawData
我们的 rawData 都在一个个的 sfc 文件中,如何读取这些文件并将文件的内容提取出来?
如果使用 node:fs 模块编写一个脚本,将 examples/**/*.vue 解析出来,
每次新增组件都要重新跑一次脚本?
好在 vitepress 提供了 Build-Time Data Loading,
只要定义一个以 data.js 或者 data.ts 结尾的文件,它就是一个数据加载器,
数据只会在构建时执行,生成的数据最终会序列化为 JSON,并且可以导入到任意的页面或者组件。
我们只需要 watch: ['../examples/**/*.vue'],并调用 node:fs 模块,将 SFC 文件的 content 解析出来,
并以 { sfcName: 'sfc component name', sfcRawData: 'sfc file content' } 的形式返回出一个数组即可:
import fs from 'node:fs'
import path from 'node:path'
interface Example {
sfcName: string
sfcRawData: string
}
declare const data: Example[]
export { data }
export default {
watch: ['../examples/**/*.vue'],
load(watchedFiles: string[]) {
return watchedFiles.map(file => {
const relativePath = path.relative(path.resolve(__dirname, '../examples'), file)
const filename = relativePath.split(path.sep).join('-')
const { name } = path.parse(filename)
const content = fs.readFileSync(file, 'utf-8')
return {
sfcName: `ex-${name}`,
sfcRawData: content.toString()
}
})
}
}ex-code
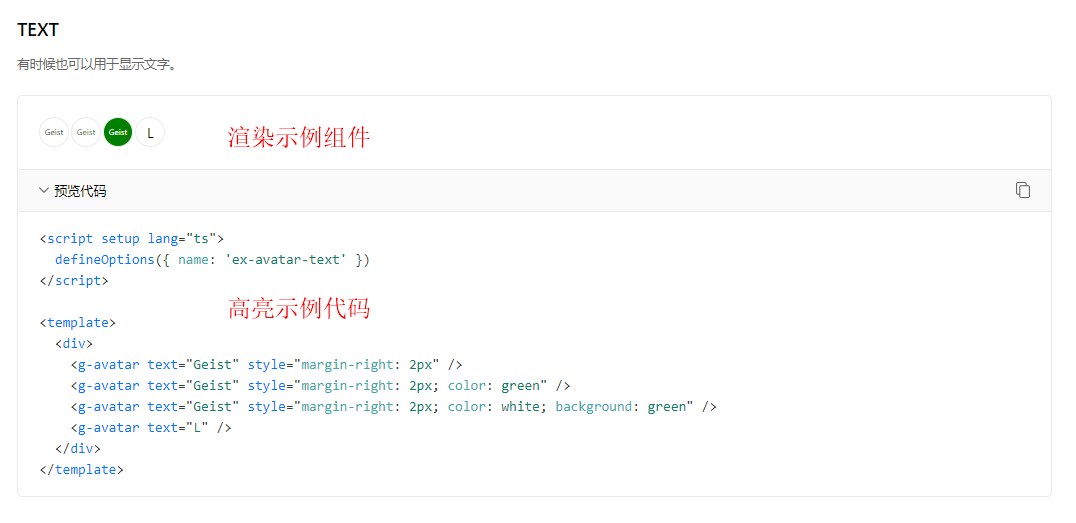
<ex-code /> 用于渲染组件 + 高亮代码:
<ex-code name="ex-avatar-text">
有时候也可以用于显示文字。
</ex-code><script setup lang="ts">
defineOptions({ name: 'ex-avatar-text' })
</script>
<template>
<div>
<g-avatar text="Geist" style="margin-right: 2px" />
<g-avatar text="Geist" style="margin-right: 2px; color: green" />
<g-avatar text="Geist" style="margin-right: 2px; color: white; background: green" />
<g-avatar text="L" />
</div>
</template><script setup lang="ts">
import { reactive, onMounted } from 'vue'
import { data as examples } from '../data/examples.data'
defineOptions({ name: 'ex-code' })
const props = defineProps({
name: {
type: String,
required: true
},
hiddenCode: Boolean
})
const state = reactive<{ codeName: string; codeTemplate: string }>({
codeName: '',
codeTemplate: ''
})
onMounted(() => initState())
async function initState() {
const arrs = props.name.split('-')
// [前缀,组件名称, ...其他]
const [_, __, ...rest] = arrs
state.codeName = rest.join(' ')
state.codeTemplate = examples.find(
({ sfcName }) => props.name === sfcName
)!.sfcRawData
}
</script>
<template>
<client-only>
<div class="vp-raw ex-code">
<h3 class="g-subheading code-name">{{ state.codeName }}</h3>
<p class="desc" v-if="$slots.default">
<slot></slot>
</p>
<g-card class="ex-code-box" :class="{ 'box-hidden-code': hiddenCode }">
<component :is="name" />
</g-card>
<details class="details" v-if="!hiddenCode">
<summary>
<div class="summary-row">
<span class="preview">
<ex-icon-arrow class="down" />
预览代码
</span>
<ex-icon-copy class="copy" @click.stop.prevent="copyCode" />
</div>
</summary>
<ex-prism class="ex-source-code" :code="state.codeTemplate" />
</details>
</div>
</client-only>
</template>- 通过
vp-raw解决了样式冲突; - 通过
import.meta.glob批量注册组件; - 通过
prismjs高亮代码; - 通过
Build-Time Data Loading获取rawData;
至此,使用 vitepress 搭建组件库文档已经可以完美开始了。